29 July, 2014

Bike Ride 62 - Groot-Marico to Home

The last day of our 3 day outing, and it turned out to be quite a long day with all the stops we made on the way home.

We woke up after a good night's rest, and I got myself and Trish a cup of coffee and tea from the kitchen. Had it with some rusks we had over from the previous morning.

I went to the store room and got out my bike, and parked it with all the others on the lawn. then we sat down to a scrumptious breakfast, which contained some venison livers. It was delicious. Then we went back to the room packed all our stuff and then made our way home. Slowly. We stopped for photos at  8 Places (7 for the BMW Challange) and 3 geocaches.

We first went back into Groot-Marico for the Town Photo (Photo 1), and then got some petrol. Then made our way to Swartruggens (Photo 2) for a town photo and geocache. I must say the toll road costing R75.00 is ludicrously expensive, and must be the worst toll road I have ever ridden on. It is bumpy as hell.

We stopped at the Selons river bridge for a quick smoke break and geocache, and the onward to Boshoek for another town photo. We also stopped at a "Welcome to" sign by Pokeng (Photo 3).  I found it funny when I thought of "Welcome to Pokeng (nothing)". There was a huge stadium to our right as we approached Boshoek from the south. I thought it might be a 2010 World-cup stadium, but I was later to learn that it was not as we saw the real 2010 stadium later on in Rustenburg.

Photo 1
Photo 3
Photo 2


We took our Boshoek town photo by the post office (Photo 4), and then also stopped at a small antique store just up the road to buy some small souvenir of our trip. Trish got a "Love is patience" tile, and I saw a small knife which I wanted to add to my small collection.

Then it was through Rustenburg on the  R104, and we stopped at Kroondal for our next photo (Photo 5). We also looked for a place to have a drink, but we saw non to inviting. Then by mistake we got onto the N4 and off again at Buffelspoort where we had something to eat and drink at the garage. There were lots of other GS riders stopping at the garage, and riding past. There must have been some weekend thing on the go nearby for them. We took a photo here as well, but it was not part of the BMW Challenge (Photo 6).
Photo 4
Photo 6
Photo 5
Then onward over the N4 to Marikana, where we took a town photo in front of a hardware store. Then carefully road further in to get to Wonderklip, but since there was a sand road going to Wonderklip and Wonderklip is a tar town challenge decided to turn around, as the dirt road looked a bit dodgy. But looking at the GPSr I saw it was only 3 or 4 km away and the route around would take us a lot longer. Also if we did not do the town now then we would not be back this way in a long long time. So we turned around again and rode there along the train tracks and past a big mine. We were also stopped at a train crossing before leaving Marikana by a passing train.

Must say we did not feel to safe riding through Wonderklip. There was some uneasiness for both Trish and I so we decided to rather turn around and take a photo at the hospital sign as we entered Wonderklip. After the photo we got back on the bike and looked forward to the tar road ahead. It took us at lease 4 km before we hit the first patch of tar. I dont think a RT will make it there in one piece. The dirt road is quite bumpy.

Photo 7
Photo 8

Once we hit the N4 is was plain sailing all the way to Tant Malies where we stopped for a smoke break, and decided to get some Dutch goodies from the Windmill on the other side.

Its lekker to e on a bike. There was a long queue of cars to get through the tunnel, and us with 2 other bikes just split laned past them all, and without the need to stop got through the tunnel no problem.

We drank a quick milkshake at the Windmill, and then bought our goodies inside, and then did the last leg of our journey home. We arrived home just after 5PM. A long day ... but a good day.

We did a total of  980 km in the 3 days, and a total of 13H30 hours moving time.


26 July, 2014

Bike Ride 61 - Delareyville to Groot-Marico

This was an awesome day, although we arrived at Groot-Marico an hour later then I had planned / wanted to.

We took our town photo in front of the B&B where we stayed and headed north around 08H15 through to Sannieshof and then Biesesvlei, and then further onwards to Lichtenburg. In Lichtenburg we took out town photo, did two geocaches (one was by Gen Delarey's grave site), visited 2 petrol stations to get to the loo, and then headed further north to Ottoshoop.


Ottoshoop is a strange town. Seemed like it had one street, and lots of bumps. A bump about very 150 meters. I went over the first few but soon enough looked for ways around them. And I was not the only one all other verhcles had made new paths around the bumps as well. So much so that there was almost a permenant dirt road next to the tar road. We saw quite a few houses, and it seemed like of people who had retried here. The police station looked like the only "business" in town. The libruary was closed where we took out town photo.

 
After the photo we went for coffee at "Die Gat - Pub and Grill" just outside of town. They had to rush out and buy some coffee and milk. We also had a quick plate of chips and then left for Groot-Marico knowing that we were now somewhat late.

We did a quick town photo stop in Zeerust, and then arrived at Groot-Marico just after 12H30. Most of the BMW club members were there already. But they were just moving into a small building where we were entertained by some Herman Charles Bosmad stories, poems (set to music). I did not think it would be that great, but I was blown away by the way they presented. 10 out of 10 for the living museum at Groot-Marico.

Then it was off to the farm where we would be staying for the night, and where we would get to sample some mampoer. Johan the farm owner entertained us the whole afternoon, by telling us how he makes mampoer the traditional way, and the whole process involved to get to the final product. After the lessons in making the mampoer, we were then escorted to the log veranda were we were now instructed in the proper way to consume the mampoer. Stoelle!


After the sampling we then had the most amazing dinner of venison meat, potatoes and veggies. It went down a treat. Then it was off to bed to get some rest after the whole days excitement.

Bike Ride 60 - Home to Delareyville

Some one at the BMW Motorcycle club in PTA organised a trip to Groot-Marico to go and "sample" some mampoer. Since it has been almost a year since we last added some new towns to our visited list, I thought it was the right time to combine the two thoughts into a single long weekend outing.

I got a days leave from work, and on Friday the 4th July we headed just after 7H15, out towards the West Rand via the N3 South then via the M2 onto Main Reef road. We stopped for coffee and a small bite to eat at McDonalds just after 08H00.

Soon after that we got the open road, and did a quick stop doing a geocache at the Tarlton Race track, and then headed to Magaliesburg, and then using the R509 towards Derby and Koster.

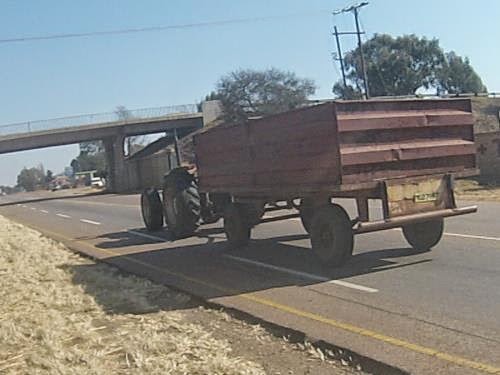
The people in Koster are so behind the times they still have the old Transvaal numberplate on their trailers as can be seen in the photo :)


After Koster we headed south on the D826 and R30 into Ventersburg, where we stopped for a "Welcome to" photo, and town photo, a geocache, petrol, and lunch. We had lunch at Barcelos. The chicken burgers were very tasty but a bit small. Chips were outstanding.


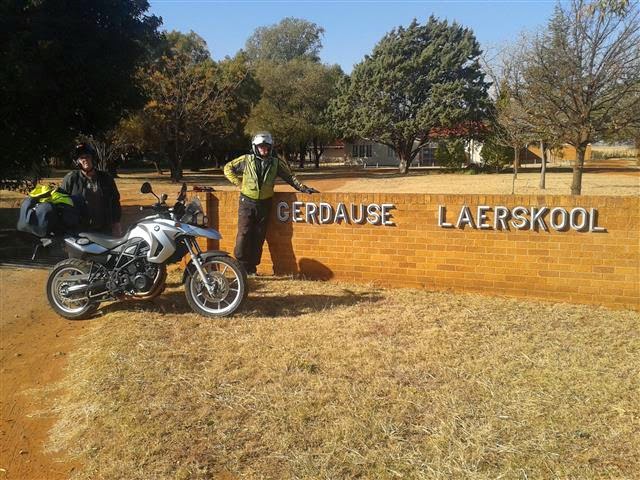
Then we headed west ward on the N14, and got some photos in Coligny and soon afterwards at Gerdau. On the road between Gardau and Ottosdal we picked up another 4 geocaches where the last one was at the church where there were Voortrekker tracks in the cement at the memorial.

Then it was the last 50 odd km towards Delareyville where we would stay for the night.

After finding a place to stay, I went to the shops for milk and rusks for our coffee and tea. After putting the action camera, intercom and cell phones on charge we we went for dinner at the restaurant the B&B was part of. Dinner was very good, and reasonably priced. Dinner and the night's stay came to just over R700.00.

The B&B looked very good, but the shower did not have a soap dish, and the bed felt very cheap. There was also some hooting at 2AM in the morning close by. All in all we give this place a 6 out of 10.

03 June, 2014

ISEE-3 / ICE - The little satellite that could ... return to earth.

Amazing what they got right in 1986. But before I get to the amazing part some history background  .... with links to the original source.

1978
A state of the art satellite, called the International Sun/Earth Explorer 3 was launched on the 12th of August the 1978. The satellite was to explore the interaction between the earth’s magnetic field and the solar wind. It completed this mission in 1982. (link)

1982
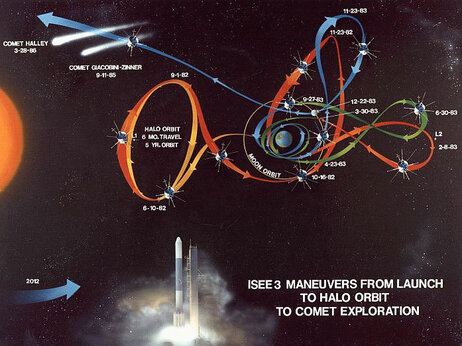
It was then renamed International Cometary Explorer (or ICE) and sent on a new mission. After a thrusters burn on the 1st of September 1982 and making a series of lunar orbits for the next 15 months the little space craft, using the gravity or the moon and earth, was set in a heliocentric orbit ahead of earth. (This is a orbit around the centre of our solar system ... thus around our sun).
To me this is somewhat amazing .... and the real amazing part is still yet to come...
They ... and it sounds like Bob Farquhur was the brains behind it ... did all these manoeuvres over the 15 month period so that the satellite got to its orbit with the least amount of fuel spent.
(link)

The previous 15 months of manoeuvres allowed the space craft, in its heliocentric orbit, to fly through the plasma tail of Comet Giacobini-Zinner  on 11 September 1985
(link)

1986
In March of 1986 it also passed through the tail of Halley’s comet.
(link)

1991
In 1991 NASA approved what was to be this satellites last mission. It was to investigate the coronal mass ejections, and cosmic rays.
(link)

1997
On the 5th of May 1997 NASA ended the ICE mission, and ordered the probe to be shut down except for the carrier signal left operating.
As of January 1990, ICE was in a 355 day heliocentric orbit around the sun and more or less in the same orbit path as earth. This means in time to come it would catch up to earth again.
 (link)

1999
NASA made brief contact with ICE to verify its carrier signal. 12 of its 13 experiment sensors were still in working order. NASA then decommissioned the equipment to communicate with the satellite.

April 2014
Almost 15 year after the last contact the satellite is nearing earth once more and a group of engineers are making a great effort to recapture the satellite into an halo orbit near earth.

When the guys in 1986 (and Bob Farquhur specifically) set the course for this satellite they had planned for it to come back to earth ... and hoped that it can be recaptured.

This little 390 kg satellite has travelled over 24 billion kilometres, revolved around the sun 27 times, and soon will be close enough to the earth to be recaptured. 

From: media.npr.org
The amazing part is .... To recapture the satellite into its halo orbit we need the moon. This means that the engineers in 1986 had to make sure that the moon would be in the right place at the right time sometime in August 2014. And after its 24 billion km of travel, around the sun 27 times, it is out by a mere 30 000 km. How is that for planning decades in advance! This also means that the orbit they chose for ICE so many years ago had to co-inside with where the moon would be. Quoting verbatim from here:
Consider this, the spacecraft has completed almost 27 orbits of the sun since the last trajectory maneuver. That is 24.87 billion kilometers. They are off course by less than 30,000 km. I can't even come up with an analogy to how darn good that is!! That is almost 1 part in ten million accuracy! We need to confirm this with a DSN ranging, but if this holds, the fuel needed to accomplish the trajectory change is only about 5.8 meters/sec, or less than 10% of what we thought last week!
We truly stand on the shoulders of steely eyed missile men giants..

The Reboot Project
Some guys who were part of the Lunar Orbiter Image Recovery Project (LOIRP) (link - http://www.moonviews.com/mcmoons-aka-building-596/ ) project have taken on the challenge with NASA’s blessing to get the satellite back into working order and get us civilians access to the data. To get this right they need to fire the thrusters in the next week (more or less before 10 June) to make the small course correction so it can swing around the moon ... possibly missing the moon service by less than 50 km, can come back into a stable halo orbit near earth.

I will be following the Reboot project with fascination.
All the details and technical info is over at spacecollege.org  (http://spacecollege.org)

Bob Farquhur
Here there is an article about Bob Farquhur ... and his genius mind at working out these orbits... again quoting verbatim:
Farquhar is now 81 years old. He's been called the master of getting to places. His genius is inventing esoteric flight plans that take advantage of gravitational boosts from the moon and close flybys of Earth to send space probes zipping around the solar system in surprising ways. 
He's so adept at calculating these exotic trajectories that often, just for fun, he's made sure that key mission events fall on birthdays or anniversaries.
The exploits of ISEE-3 were the first ones to really show off what Farquhar could do. "Certainly all the people in the space business know that that's my spacecraft. It's very personal with me," he says.


27 May, 2014

Raspberry Pi East Rand Jam Session #2


The next Raspberry pi session was set for Sunday the 18th of May.

We started a bit late but still got a few things done.
We basically completed two tasks.

(Task 1 - USB video camera)

I had read that the Sony Eye toy camera works on the Raspberry Pi, so I found the kids PS2 and removed the dusty old usb camera. Search a few sources online and found out it was quit simple to get a compatible usb camera to work with the Raspberry Pi.

Basically I just had to do a :

sudo apt-get install motion

Then go and edit the config file in /etc/motion/motion.conf

At the time I did not make a backup of the motion.conf file and it was a pain to undo the mess I made in the file. So from now on I will always make a backup of config files before I play with them.

I used this web site for most of the motion stuff we did:
http://pingbin.com/2012/12/raspberry-pi-web-cam-server-motion

As it turns out this eyetoy no longer works with the update Raspbeian I am running.
Got hold of my wife's usb camera and tried that no luck either.
I then dug out an old usb camera from a cardboard box in the back of my cupboard and would you believe it it worked!

Doing a motion -n I captured a few frames and they were dropped in the /tmp/motion directory (after I created it).

We did the sane to Clive's Pi, and it worked there as well.

Task 1 completed.

As a next task I plan is to focus the usb camera at my pond outside the window and tweet a picture every hour or if it is light.

 (Task 2 - Reading a light source using a LDR)

Quite some time ago I got a blue case with a lot of electronic components in a small draw from someone at work. The week before I went through the draw and and came across a LDR
 Also since then I went to this robotics web site and bought a bunch of small components for a few Rand. Not to much.

I waweb page that showed how to use the LDR with another resistor and a capacitor to read in a time delay value. I found this ingenious!
s wondering how I could use this LDR on the pi to read how light or dark it was. Doing some searching I came across this

I built the circuit and entered the program and ran it. I got very high values. I think this is due to the LDR being quite big, and the capacitor being 10 uf rather than 1 uf.

When Clive arrived we went through the box of goodies I bought the the robotics store and there were some tiny little LDRs. We rebuilt the circuit using it and got much smaller values from the running program.

Conclusion

All in all we only spent about 3 hours playing with the raspberry pis, but again learnt a little bit.

Next Jam session

I read this article on /. (slashdot) about Anonymous where they created AirChat which is a set of software components that one can use when all internet traffic comes to a stand still in war torn countries and of course other scenarios.

This got me thinking if it is possible with my limited knowledge of Linux to build a chat application between two RPis using FM transmitters. The idea is to use a soundmodem  to transmit data via from the PI be received by a plain old FM radio on the other side. Get the sound back into the Pi (perhaps via a cheap usb soundcard) and decode the message.
I think it would be cool as a RPi project to get two RPIs to chat to one another over some distance without using current infrastructure such as WiFi, or LAN.

I'll toy with the idea and see if I can hack something together.

I wonder if an advanced Linux hacker / programmer could get a LAN Card driver to work using Soundmodem and FM radios.


02 April, 2014

Raspberry Pi East Rand Jam Session #1

Some background

I bought a Raspberry Pi a long long time ago ... when it was still R 360.00. They are now over R 500 with the exchange rate.

I have been wanting to play with the RPi for quite some time now, but have just not had the will power or energy to do anything other than the XBMC setup.

Clive, a friend from work, said he was also interested in jamming a bit with the RPi so we set a date for Sunday the 30th March. We went out to a local electronic shop the week before to buy a few parts such as LEDs to make a basic circuit we could connect to the GPIO pins. We also got a USB keyboard and mouse from Matrix warehouse.

I had also advertised the Jam session on the RaspberryPiAfrica facegroup page. But no-one was interested in joining us. Pity.

Soon enough Sunday morning arrived and after a lekker breakfast we set up ourselves up close to the ADSL modem so we could connect our RPi's to the internet.

We had both already downloaded NOOBS 1.4.3 and we copied the unzipped files to the 8 Gig SD cards we had previously bought (also from Matrix computers in Edenvale).

Then we booted them both up and told the NOOBS interface we wanted to install Raspbian as per this page.  We only had one HDMI screen at this stage so we took turns to use the screen as and when each RPi needed the next command instruction.

(Task 1 - Remote desktop)

Then I remembered one can Remote Terminal into the Pi and a quick search later we found this command which we both executed on our RPi's:

sudo apt-get install xrdp

From then on we could remote terminal into the Raspberry pi's.
Oh yes on the ADSL router I gave both Rpi's pre-defined DHCP IP addresses so the IP addresses would remain the same after reboots and for the next jam session(s) as well.

(Task 2 - FM Transmitter)

Our first real project was the FM Transmitter.
We found this info and followed the 3 or 4 easy steps. However I don't know what the micro usb cable is meant to be used for, and we used a single wire (incorrectly!) to connect to pin 4.

We got a total distance of about 5 to 7 meters, and I think we were using the wrong pin. I'll redo it at our next jam session.

Clive also had a look at how it works, and saw it was based on a simple c++ program.

(Task 3 - Blinking LED)

We then set out to do the Blinking LED.

This took us quite awhile to complete.

We initially used this web page, but I found the instructions were not that clear (the unclear bit was where the GPIO software was to be downloaded from. Later on I realised the link was there... it was just not obvious). We also had to figure out how the breadboard worked, as it has been close to 20 years since I last worked with electronics down to this level.

We each built our LED circuit. We linked a 270 ohm resistor to positive and the other side to the LED. Clive remembered that the leg length of the LED denotes to which side of the circuit it should be connected. The other side of the LED was then connected to ground. We then tested each of our circuits with 2 penlight batteries (close to 3 volts) from my trusty GPS receiver.
The circuit worked!
Then it was time to link it up to the RPi.
I know one has to be very careful when connecting the pins of the Pi, as an incorrect connection can blow the chip. So we took our time to understand how the GPIO pins work.

From this page we saw we needed to download some stuff (We also used some info from here) After getting the code into the directory,  unzipping it, building it,  and then finally executing the following commands:
  gpio -v and
  gpio readall
and checking the output we realised we had two different version of the Pi.

Both Clive and I have the version B boards, but Clive had the revision 1 board and I had the revision 2 board. And there were pin differences. After a lot of head scratching and googeling we realised there are chip pins, output pins and BCM pins. All very confusing, but the output pins we would be using for GPIO0, GPIO1 and GPIO2 were the same on the two boards.

Note: Since Clive works quite a bit with Java he knew all the unix commands quite well, and he mentioned that the jar files Java uses are a lot the same (as in use) as the tar files unix uses.

We linked up our circuit wires to the Pi on output pins 9 and 11 (from my understanding pin 6 was the same as 9) and executed the following commands (as per this page)
  gpio mode 0 out
  gpio write 0 1 and
  gpio write 1 1 

It worked!

Clive wrote the python script to automate the blinking and once it was running on his Pi, we copied it over to my Pi (with some difficulty). I must also note Clive knew "vi" (a unix editor) quite well. I don't know it at all. (I have used it in the past and didn't like it then, and don't like it now). I resorted to opening the file in "File manager", by navigating to the file and then right clicking on it and editing in a nice GUI environment. Much easier, and more intuitive.

This was the first time I ever played with Python. Up to now all I knew about Python was that indentation is a way of grouping commands. The script was easy enough to understand.

We then set out to build another 2 LED circuits and soon had them hooked up as well.
I modified my python script to blink as per the video below.

Not exactly as I wanted it (2 LEDs must stay on all the time). I'll fix that in our next jam session (if there is time). The plan is also to build a little traffic light out of the 3 colour LEDs.

We started at 10 AM and by now it was already 4 PM. 6 Hours in total spent playing with the pi, and getting 2 "interface-with-the-real-world" projects done.

For our next jam session we hoping to have a few more people over on the 11th May, and we planning to do the following:
  1) Get a usb camera to work over the internet.
  2) Get a traffic light to work (playing with python)
  3) Get some switches to plug into the breadboard so we can read from them, and then do something with the LEDs.
  4) If there is time left, check up on the FM transmitter and see if we can get more distance out of it.

One thing though ... I think one has to be very careful by getting to much information on the net about the RPi. If one web page tells you to do one thing it might be with their specific code or binary file. Applying this to some other binaries downloaded might end up in disaster.

I will blog again as to the results of the next JAM session.

If you are interested in joining us then visit the RaspberryPiAfrica page on Facebook

And in the wise words of RWJ .... "I approve this post" - Over and Out.

01 January, 2014

Eastern Cape, PE, Port Alfred, and Baviaanskloof

We spend our December holidays in PE.

This year we bought a 3 bike, bike trailer and we took my bike with the 2 boy's 125 cc bikes down with us.

I basically did 3 long(ish) rides in the 3 weeks we were there, and covered a total of about 3500 km.
They have a lot more muggies in the eastern cape then up here in Gauteng as could be seen after each bike ride on my visor. Its also a lot more humid, and one gets hot in the bike gear lot quicker then up here. But boy ... the scenery is lovely.
TripsMade_01.JPG


The first ride, was with a good geocaching lady friend of mine called 'grannynasty' who used to be a biker as well. We headed towards Lady slipper and took a lovely sand road to the right of the mountain. Nice hard and compact dirt road most of the way . I could handle 80 kmph + almost all the time. Went past a lot of farms, and the most amazing scenery.
Right on top of the mountain we saw a geocache, not to far off the main road in Baviaanskloof, and decided to head in that direction. At one steep section I lost traction and fell. Luckily grannynasty was not on the bike. Ego dented big time. Luckily it was mostly paint work scratched. We then went via Hankey and Petensie to view Victoria's bust, and after almost 300 km arrived safely back home.
Three_Squares_Three_Rectangles_Grid_01.jpg


The second ride was with the Trish and the boys on their bikes to Jeffrey bay. Anya was on the back of Jerome's bike, and we handled around 80 kmph most of the way. It was another hot humid day. Viewed all the people at the beach and then went for drinks. Boys rocon there were lots of hot girls about. And Any also said there were a few hot guys to be seen.

We had a pitsa in a cone, and then returned back home having a quick stop at Van Stadensrevier bridge.
Three_Squares_Three_Rectangles_Grid_02.jpg


My 3rd ride was to Port Alfred with grannynasty accompanying me , and we had a lovely ride along the coastal sand road after visiting Bushmans, Kenton on sea, and Port Alfred for some geocaches.
The coastal road was an awesome ride, via Cannon Rocks and Addo Elephant Park back to Alexandria and then back home. grannynasty also took me to Landmans monument. Wow what a site that was. The monument was in the shape of the earth with ossewa and oxen over South Africa to commemorate the Voortrekkeers.
Next time we will take the other coastal road from Alexandria to N2 running parallel to R72. Did a total of 400 km that day. It was another awesome outing.

Three_Squares_Three_Rectangles_Grid_03A.jpg


Three_Squares_Three_Rectangles_Grid_03B.jpg
Do not read the contents of this post while operating a motorcycle, unless advised to do so by a physician.